Saturday, 12 September 2009

Creating A Start-up Disk (windows 95,98,ME)


Creating A Start-up Disk (windows 95,98,ME)

In this Blog we will learn how to make a boot disk for windows 95,98,ME operating system. A boot disk can start the operating system on a computer running Windows if it will not boot properly and the damage is suspected to be in the files that start Windows 95,98,ME. This is handy, and the disk should be stored safely.
  • Place a blank floppy disk into your floppy drive.
  • Go to Control Panel by first clicking on the Start Button.
  • Click on Control Panel icon.
  • Double click on the Add/Remove Programs icon in your control panel.
  • At the top of the screen you will see the Start-up Disk Tab select it.
  • After selecting the Start-up Disk Tab, click on the Create Disk button to create your disk.
  • Windows will prompt you to label your Start-up Disk and insert it into your floppy drive.
  • Simply click on OK to continue, to begin making your Start-up Disk.
  • Windows will display a progress indicator bar denoting the status of your System Disk.
  • When the status bar reaches 100% your System Start-up Disk will be complete.
  • You can now close the start-up disk window by clicking on OK at the bottom of the screen.
  • Store your Start-up Disk in a safe location.
Boosting Your PC Performance


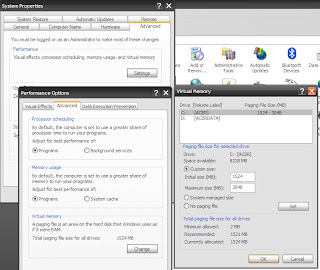
We all want our PCs to run Faster this method works to an extent without boosting your RAM. The Aim is to Utalise un-used hardisk space as ram, If you have excess Hard disk space where 20% or more of your hard drive is free. Note once allocating this memory to be used as RAM it will not be able to utalise it for general data use. This memory is already allocated by your OS system in this case XP all we will be doing is increasing the minimum value.

Close all application before you do this

# Start > Control Panel > System

# Select the Advanced Tab

# Select the Settings button under Performance

# Select the Advance Button

# You will see a Change Button under Virtual memory, click on it

# Select A suitable drive, it is advisable to use the same drive that is used by your OS in my case its the C: drive, this ram must be available to the OS at all times So for those with that want to use a USB stick this stick must at all times be connected to the Computer!! (VISTA USES THE DISK SPACE IN A TOTALLY DIFFERENT WAY TO XP AND OLDER OSs)
# Under the custom button increase the value of the initial allowed ram and the maximum allowed memory to be utilised as RAM. please make sure you enter a value and I would not recommend you using a lower value then what your OS has recommended.
# Hit the set button the changes will take place.
# Your PC MAY restart to accomodate the changes.

This is known as a paging file and Windows utilises the memory you have allocated as RAM.

Friday, 11 September 2009

Alternate Open Source to DreamWeaver


Finally GadgetGaGa Fans there is a great Open Source alternative to Adobe Dream weaver and its compliant with all the Major OS systems: APTANA (http://www.aptana.com/) Has come to delivering the closest and at times even more than Dreamweaver. Best of all it is free. Its compatibility with HTML, CSS, PHP, Ruby and JavaScript as well as other languages makes it standout. Another great HTML software editor is SEA Monkey this software is supported by the mozilla foundation. GadgetGaGa feel that this is great to get you playing around and developing lovely web pages.